


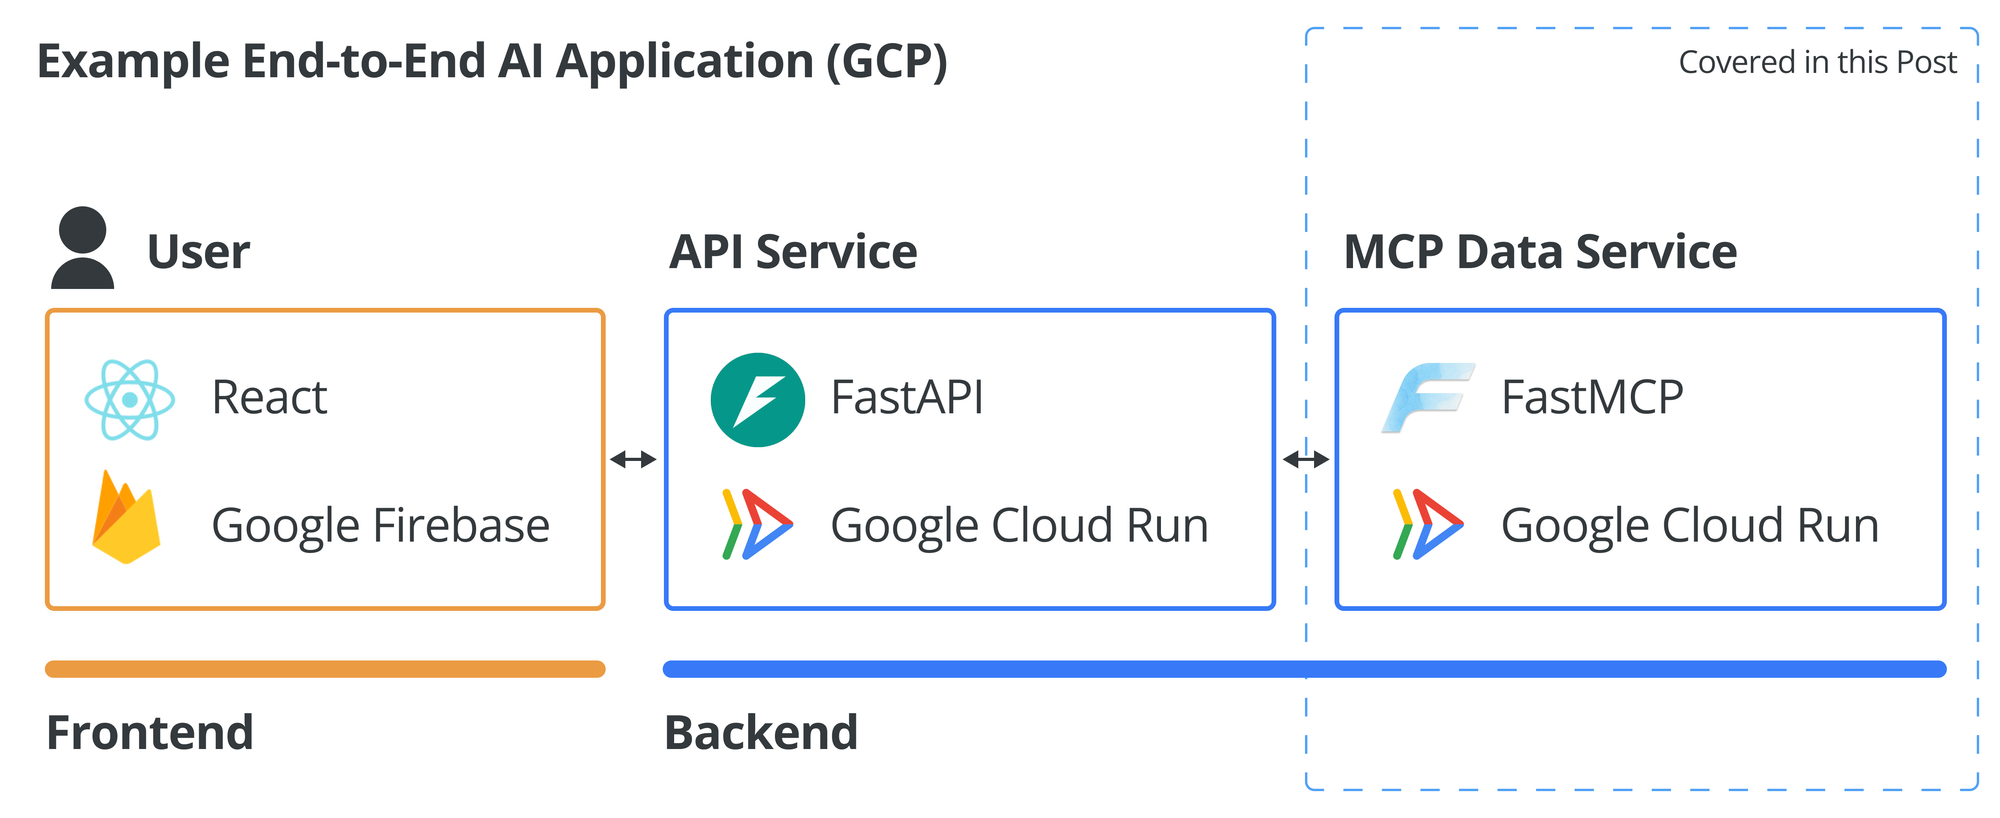
Previously we had done a one day tour for MCP: Model Context Protocol. This was only four months ago. But four months is a long time when it comes to AI development! Today let's take one step further, and describe how we can deploy the simple MCP server we had built. That way, this MCP server can act as a data service or data provider within an end-to-end AI application that you might architect one day.
Prerequisites
This would be a more complex one day tour, and builds on quite a few topics we had covered before:
- Python package manager
uv: see this one day tour. - MCP one day tour: we will use the same stock data as before.
- Docker: you might already have Docker Desktop, or alternatively, OrbStack.
- GCP: if Google Cloud is new to you, we have a quick guide to get started below.
Working with GCP
Big public cloud providers like GCP and AWS can feel daunting. Both have over 200 services, and knowing which service to use for which situation can be confusing.
But familiarity with GCP and AWS is quite rewarding. And, truth be told, out of hundreds of services, you probably just need to know a few core ones to be productive. So set up the development kit, and let's play with it!
Getting started with GCP just takes a few steps:
- Download and install the
gcloudCLI with these instruction. - Chances are you already have a Google account, say, for Gmail. Use
gcloud auth loginto use a preferred Google account for GCP. - With GCP, you have projects. So create a project in the GCP console. You can also create new project with the
gcloudCLI. - Configure your local development environment to use the new project by
gcloud config set project {PROJECT_NAME}
Enabling Services
We need to also enable the following two services:
# Enable Cloud Run, and Artifact Registry (where docker images are stored)
> gcloud services enable run.googleapis.com
> gcloud services enable artifactregistry.googleapis.com

# Configures docker to authenticate with Artifact Registry
> gcloud auth configure-docker
Setting Up MCP Project
With uv, it's very easy to set up the MCP python project. In a folder of your choice, run the following:
> uv init
> uv add fastmcp pandas uvicorn
For our main.py, we will use nearly identical set up as the previous one day tour on MCP. Namely, an MCP server that returns stock analysis data.
# main.py

import json
import uvicorn

import pandas as pd

from fastmcp import FastMCP, Context


FILE_PATH = "./data/"
mcp = FastMCP("StockExplorer", dependencies=["pandas"])


def get_likely_symbols(company_name: str) -> dict[str, str]:
    """Get all stock symbols that contain the company name."""
    all_symbols = pd.read_csv(FILE_PATH + "symbols_valid_meta.csv")
    matches = all_symbols[all_symbols["Security Name"].str.lower().str.contains(company_name.lower())]
    return matches.to_dict(orient='records')


@mcp.prompt
async def find_ticker(company_name: str) -> str:
    likely_symbols = get_likely_symbols(company_name)
    return f"""
I need to find the ticker symbol for {company_name}.

First, please look at the likely list of stocks, provided below.
Then, search through that data to find the best matching company name and return the ticker symbol.
If there are multiple potential matches, please list the most likely one.

Here are the likely stock symbols:
{json.dumps(likely_symbols, indent=2)}
"""


@mcp.resource("stats://{symbol}")
def resource_stock_stats(symbol: str) -> str:
    """Get stock stats for a given symbol."""
    all_symbols = pd.read_csv(FILE_PATH + "symbols_valid_meta.csv")

    matching_symbols = all_symbols[all_symbols["Symbol"] == symbol]
    if matching_symbols.empty:
        raise ValueError(f"Symbol '{symbol}' not found in our database")

    symbol_data = matching_symbols.iloc[0]
    is_etf = symbol_data["ETF"] == "Y"
    if is_etf:
        folder = "etfs/"
    else:
        folder = "stocks/"

    full_path = FILE_PATH + folder + symbol + ".csv"
    df = pd.read_csv(full_path)
    oldest_date = df['Date'].min()
    newest_date = df['Date'].max()

    # Take the most recent 50 rows for analysis
    recent_df = df.tail(50).copy()

    # Calculate daily returns
    recent_df['Daily Return'] = recent_df['Adj Close'].pct_change()

    # Calculate key metrics on recent data
    recent_return = ((recent_df['Adj Close'].iloc[-1] / recent_df['Adj Close'].iloc[0]) - 1) * 100
    recent_volatility = recent_df['Daily Return'].std() * (252 ** 0.5) * 100  # Annualized

    # Calculate moving averages
    recent_df['MA20'] = recent_df['Adj Close'].rolling(window=20).mean()

    # Calculate RSI (14-day)
    delta = recent_df['Adj Close'].diff()
    gain = (delta.where(delta > 0, 0)).rolling(window=14).mean()
    loss = (-delta.where(delta < 0, 0)).rolling(window=14).mean()
    # Avoid division by zero
    loss_nonzero = loss.replace(0, 0.001)
    rs = gain / loss_nonzero
    recent_df['RSI'] = 100 - (100 / (1 + rs))

    # Get high and low
    recent_high = float(recent_df['High'].max())
    recent_high_date = recent_df.loc[recent_df['High'].idxmax(), 'Date']
    recent_low = float(recent_df['Low'].min())
    recent_low_date = recent_df.loc[recent_df['Low'].idxmin(), 'Date']

    # All-time high and low
    all_time_high = float(df['High'].max())
    all_time_high_date = df.loc[df['High'].idxmax(), 'Date']
    all_time_low = float(df['Low'].min())
    all_time_low_date = df.loc[df['Low'].idxmin(), 'Date']

    # Recent average volume
    recent_avg_volume = int(recent_df['Volume'].mean())

    # Current price
    current_price = float(recent_df['Close'].iloc[-1])

    stats = {
        "data_summary": {
            "full_date_range": f"{oldest_date} to {newest_date}",
            "analysis_period": "Last 50 trading days"
        },
        "recent_performance": {
            "return_pct": round(recent_return, 2),
            "annualized_volatility_pct": round(recent_volatility, 2),
            "current_rsi": round(float(recent_df['RSI'].iloc[-1]), 2),
            "highest_price": {"price": round(recent_high, 2), "date": recent_high_date},
            "lowest_price": {"price": round(recent_low, 2), "date": recent_low_date}
        },
        "technical_indicators": {
            "current_price": round(current_price, 2),
            "20_day_ma": round(float(recent_df['MA20'].iloc[-1]), 2) if not pd.isna(recent_df['MA20'].iloc[-1]) else None,
            "price_vs_ma20": f"{round((current_price / float(recent_df['MA20'].iloc[-1]) - 1) * 100, 2)}%" if not pd.isna(recent_df['MA20'].iloc[-1]) else None
        },
        "historical_context": {
            "all_time_high": {"price": round(all_time_high, 2), "date": all_time_high_date},
            "all_time_low": {"price": round(all_time_low, 2), "date": all_time_low_date},
            "current_vs_ath": f"{round((current_price / all_time_high - 1) * 100, 2)}%"
        },
        "volume": {
            "recent_avg_volume": recent_avg_volume,
            "latest_volume": int(recent_df['Volume'].iloc[-1]),
            "volume_trend": "Above average" if recent_df['Volume'].iloc[-1] > recent_avg_volume else "Below average"
        }
    }
    return json.dumps(stats, indent=2)


@mcp.tool
async def get_stock_stats(symbol: str, ctx: Context) -> str:
    """Get stats on a stock."""
    res = await ctx.read_resource(f"stats://{symbol}")
    return res[0].content


app = mcp.http_app()


if __name__ == "__main__":
    uvicorn.run(app, host="0.0.0.0", port=8001)
Since we will be deploying the MCP server to Google Cloud with Cloud Run, we will need to containerize it. So let's also prepare a Dockerfile:
# Dockerfile

FROM python:3.12-slim
WORKDIR /app

ENV PYTHONDONTWRITEBYTECODE=1 \
    PYTHONUNBUFFERED=1 \
    PYTHONPATH=/app

RUN apt-get update \
    && apt-get install -y --no-install-recommends \
        gcc \
        g++ \
        curl \
    && rm -rf /var/lib/apt/lists/*

COPY pyproject.toml ./

RUN pip install uv && \
    uv pip install --system -e .

COPY . .

EXPOSE 8001
CMD ["uv", "run", "python", "main.py"]
Testing the MCP Server (Locally)
Now we can build and run the MCP server as a docker image. We can do the typical docker build and docker run commands, but since we are thinking in terms of an end-to-end application, which can contain several services, often we'd build all services with a docker compose configuration file like below:
# docker-compose.yml
services:
  mcp-server:
    build: ./mcp-server
    ports:
      - "8001:8001"
    volumes:
      - ~/.config/gcloud:/root/.config/gcloud:ro
Then we can run docker-compose up --build, and in either Docker Desktop or OrbStack, you should see the mcp-server image running.
To test calling the MCP server, we need an MCP client, which we can do with a little script:
# test_client.py

import asyncio
from fastmcp import Client
import sys
import os


async def test_mcp_server():
    print("=== Testing MCP Server ===")
    client_http = Client("http://localhost:8001/mcp")

    async with client_http:
        await client_http.ping()
        tools = await client_http.list_tools()
        print(f"* Tools: {[tool.name for tool in tools]}")

        result = await client_http.call_tool("get_stock_stats", {"symbol": "GOOG"})
        print(f"* get_stock_stats result: {result.data}")


async def main():
    await test_mcp_server()


if __name__ == "__main__":
    asyncio.run(main())
Then we can run it with uv run:
> uv run test_client.py

=== Testing MCP Server ===
* Tools: ['get_stock_stats']
* get_stock_stats result: {
  "data_summary": {
    "full_date_range": "2004-08-19 to 2020-04-01",
    "analysis_period": "Last 50 trading days"
  },
  "recent_performance": {
    "return_pct": -25.6,
    "annualized_volatility_pct": 60.88,
    "current_rsi": 49.34,
    "highest_price": {
      "price": 1532.11,
      "date": "2020-02-19"
    },
    "lowest_price": {
      "price": 1013.54,
      "date": "2020-03-23"
    }
  },
  "technical_indicators": {
    "current_price": 1105.62,
    "20_day_ma": 1156.66,
    "price_vs_ma20": "-4.41%"
  },
  "historical_context": {
    "all_time_high": {
      "price": 1532.11,
      "date": "2020-02-19"
    },
    "all_time_low": {
      "price": 47.8,
      "date": "2004-08-19"
    },
    "current_vs_ath": "-27.84%"
  },
  "volume": {
    "recent_avg_volume": 2474984,
    "latest_volume": 2343100,
    "volume_trend": "Below average"
  }
The server is working! Time to deploy it to the cloud!
Deploying the MCP Server
This might feel a bit anticlimactic, but all it takes to deploy the MCP Server is the following commands:
# Build the docker image
> docker build -t gcr.io/{PROJECT_NAME}/mcp-server ./mcp-server

# Push the docker image to Artifact Registry
> docker push gcr.io/{PROJECT_NAME}/mcp-server

# Deploy a Cloud Run instance that runs the docker image
> gcloud run deploy mcp-server \
  --image gcr.io/{PROJECT_NAME}/mcp-server \
  --platform managed \
  --region us-central1 \
  --allow-unauthenticated \
  --port 8001
After the last command, you will probably see something that looks like:
Deploying container to Cloud Run service [mcp-server] in project [{PROJECT_NAME}] region [us-central1]
✓ Deploying... Done.
  ✓ Creating Revision...
  ✓ Routing traffic...
  ✓ Setting IAM Policy...
Done.
Service [mcp-server] revision [mcp-server-00003-85k] has been deployed and is serving 100 percent of traffic.
Service URL: https://mcp-server-{IDENTIFIER}.us-central1.run.app
What this means is that you now have an endpoint that can be called to retrieve data from the MCP server. So to test that the deployed service is working, all we need to do is replace the localhost address with the deployed address:
# test_client.py

# Replace the localhost address with the deployed Cloud Run endpoint address
# client_http = Client("http://localhost:8001/mcp")
client_http = Client("https://mcp-server-{IDENTIFIER}.us-central1.run.app/mcp")
Now, when you run uv run test_client.py, you'd be calling the MCP server that is hosted on GCP!
Authentication
You might have noticed the --allow-unauthenticated flag when we deployed the MCP service to Cloud Run. This means that the endpoint can be called by anyone who knows the address, which is of course not ideal.
Typically for an end-to-end application with several backend services, the client-facing one is the API. The API service should handle authentication, and all other backend services are only callable through the API service. That means the MCP service would not be public facing, and uses the API as the authentication filter, processing data requests only when they come from authenticated user.
Depending on use case, there are other ways to handle authentication. For example, the FastMCP library also has direct authentication support. This could be ideal if your goal is to open up your MCP Server like a data provider. In any case, it's important to always keep authentication in mind.
That is it for today's one day tour! In subsequent one day tours, we will cover more and more aspects of a full AI application, so you can build and also serve your own cool tools!


